Dual-Stack: Global Service Sharing RKE2/Cilium Proxmox
Introduction
Welcome to part 3 of the dual-stack series! In part 1 and part 2, we discovered how to enable dual-stack on a Proxmox server using our Internet provider and deploy RKE2 clusters. In today's post, we continue our journey and enable a Cilium Cluster Mesh between two RKE2 clusters. The goal is to share IPv4 and IPv6 services between the different clusters effortlessly. Let’s dive in!

Lab Setup
Infrastructure
+----------------------------+-------------------------+
|        Deployment           |         Version         |
+----------------------------+-------------------------+
|        Proxmox VE           |          8.2.4          |
|        RKE2                 |      v1.29.12+rke2r1    |
|        Cilium               |          1.16.4         |
+----------------------------+-------------------------+
RKE2 Clusters - Network Setup
+--------------------------+-----------------------------------------------+-----------------------------------------------+
|        Cluster Name       |                Cluster CIDR                   |                Service CIDR                  |
+--------------------------+-----------------------------------------------+-----------------------------------------------+
|       cluster01           | 10.42.0.0/16,2001:face:42::/56                 | 10.43.0.0/16,2001:face:43::/112              |
|       cluster02           | 10.44.0.0/16,2001:cafe:42::/56                 | 10.45.0.0/16,2001:cafe:43::/112              |
+--------------------------+-----------------------------------------------+-----------------------------------------------+
Prerequisites
Go through part 1 and part 2 of the series and ensure any prerequisites are met. If the preparation is taken care of, two dual-stack RKE2 clusters powered by Cilium will be ready.
What is a Cluster Mesh?
A Cluster Mesh can connect internal Kubernetes resources between two or more clusters. Unless a Kubernetes resource is exposed as a NodePort or a LoadBalancer resource, it will not be accessible from the outside. However, sharing resources between different clusters can be risky, thus the concept of a Cluster Mesh was developed allows operator to share resources in a secure manner.
Why Cluster Mesh?
In hybrid multi-cloud setups, we need to seamlessly connect multiple Kubernetes clusters, and share resources between them. Network connectivity issues should be hidden from the end-user or operators. This way, they can easily achieve fault isolation, scalability, and geographical distribution. Cilium Cluster Mesh made the setup and deployment easy. A Cluster Mesh was easily created between multiple clusters, regardless of the Kubernetes distribution being used.
At this point, it is important to highlight that the Cluster Mesh Requirements must met before proceeding to the next steps.
cluster01 Cluster Mesh Configuration
The Cilium installation in an RKE2 setup is expressed as a Helm chart. To check the Helm chart installed, perform the steps below.
- Get a copy of the
kubeconfig $ export KUBECONFIG=<directory of the kubeconfig>$ helm list -n kube-system
The output of the command above should look like the one below.
NAME                            	NAMESPACE  	REVISION	UPDATED                                	STATUS  CHART                                   	APP VERSION
rke2-cilium                     	kube-system	1       	2025-01-29 16:33:43.779224401 +0100 CET	deployedrke2-cilium-1.16.400                    	1.16.4
rke2-coredns                    	kube-system	1       	2025-01-25 20:29:10.096501804 +0000 UTC	deployedrke2-coredns-1.36.102                   	1.11.3
rke2-ingress-nginx              	kube-system	1       	2025-01-25 20:30:17.033314447 +0000 UTC	deployedrke2-ingress-nginx-4.10.503             	1.10.5
...
To form a Cluster Mesh, first, extract the current Cilium Helm chart values. Then, update the values file and include the Cluster Mesh configuration.
$ helm get values rke2-cilium -n kube-system -o yaml > values_cluster01.yaml
Open, update and save the values_cluster01.yaml file with the details below.
tls:
  ca:
    cert: "YOUR BASE64 CERT"
    key: "YOUR BASE64 KEY"
cluster:
  name: cluster01
  id: 1
clustermesh:
  apiserver:
    replicas: 2
    service:
      type: NodePort # Set the Clustermesh API service to be of type NodePort. Not recommended for production environments
      nodePort: 32379 # Define the listening port of the Clustermesh API service
    tls:
      authMode: cluster
      server:
        extraDnsNames:
          - "cluster01.mesh.cilium.io" # Define the dns for the Cilium mesh formation
  config:
    clusters:
    - address: ""
      ips:
      - 10.10.20.113 # The Node IP of the cluster02 cluster
      name: cluster02
      port: 32380 # The NodePort defined on cluster02 for the Clustermesh API service
    enabled: true
    domain: "mesh.cilium.io" # Define the default domain for the mesh
  useAPIServer: true # This is required for the Cluster Mesh setup
The final step is to re-apply the Helm chart with the changes. That will enable the clustermesh-apiserver to form TLS connections between the clusters.
$ helm upgrade rke2-cilium rke2-charts/rke2-cilium --version 1.16.400 --namespace kube-system -f values_cluster01.yaml
As this is a Lab setup, I am more than happy to connect the cluster via a NodePort service. But, for production environments, it is recommended to use a LoadBalancer service because if the configured node is gone, the mesh will be unformed.
cluster02 Cluster Mesh Configuration
We take the same approach for cluster02. The only difference is the values for the Cluster Mesh.
tls:
  ca:
    cert: "YOUR BASE64 CERT"
    key: "YOUR BASE64 KEY"
cluster:
  name: cluster02
  id: 2
clustermesh:
  apiserver:
    replicas: 2
    service:
      type: NodePort # Set the Clustermesh API service to be of type NodePort. Not recommended for production environments
      nodePort: 32380 # Define the listening port of the Clustermesh API service
    tls:
      authMode: cluster
      server:
        extraDnsNames:
          - "cluster02.mesh.cilium.io" # Define the dns for the Cilium mesh formation
  config:
    clusters:
    - address: ""
      ips:
      - 10.10.20.132 # The Node IP of the cluster01 cluster
      name: cluster01
      port: 32379 # The NodePort defined on cluster01 for the Clustermesh API service
    enabled: true
    domain: "mesh.cilium.io" # Define the default domain for the mesh
  useAPIServer: true # This is required for the Cluster Mesh setup
Validation
The process might take a few seconds till the mesh is formed. Patience is a virtue ⏳!
$ kubectl exec -it ds/cilium -n kube-system -- cilium status verbose | grep -i mesh
Defaulted container "cilium-agent" out of: cilium-agent, install-portmap-cni-plugin (init), config (init), mount-cgroup (init), apply-sysctl-overwrites (init), mount-bpf-fs (init), clean-cilium-state (init), install-cni-binaries (init)
ClusterMesh:                    1/1 remote clusters ready, 0 global-service
  cluster02/master03 (localhost)   10.10.20.132,2001:xxx:xxxx:xxxx::1539   reachable   reachable
  cluster01/master02               10.10.20.113,2001:xxx:xxxx:xxxx::123a   reachable   reachable
  cluster02/worker03               10.10.20.141,2001:xxx:xxxx:xxxx::1fb3   reachable   reachable
On both sides, we should see a similar view. The ClusterMesh status is in a Ready state.
If the Cluster Mesh is not formed, first try and restart the Cilium daemonset.
$ kubectl rollout restart ds/cilium -n kube-system
If the mesh is still not formed, check out the status of the Cilium agent.
$ kubectl exec -it ds/cilium -n kube-system -- cilium status verbose
$ kubectl exec -it ds/cilium -n kube-system -- cilium-health status
Additionally, check the status of the clustermesh
$ kubectl exec -it ds/cilium -n kube-system -- cilium-dbg troubleshoot clustermesh
Deploy Test Application
The moment of truth! We will deploy a dummy application and expose services via IPv4 and IPv6. The same application will be deployed on both clusters.
$ kubectl create deploy echo-server --image=inanimate/echo-server
Service Dual-Stack
cat echo_ipv6.yaml
apiVersion: v1
kind: Service
metadata:
  annotations:
    service.cilium.io/global: "true"
  labels:
    app: echo-server
  name: echo-dual
  namespace: default
spec:
  ipFamilies:
  - IPv4
  - IPv6
  ipFamilyPolicy: PreferDualStack
  ports:
  - port: 8080
    protocol: TCP
    targetPort: 8080
  selector:
    app: echo-server
  sessionAffinity: None
  type: ClusterIP
$ kubectl apply -f echo_dual.yaml
Do not forget to include the annotation service.cilium.io/global: "true" to the service.
Service IPv6 Only
apiVersion: v1
kind: Service
metadata:
  annotations:
    service.cilium.io/global: "true"
  labels:
    app: echo-server
  name: echo-ipv6
  namespace: default
spec:
  ipFamilies:
  - IPv6
  ipFamilyPolicy: SingleStack
  ports:
  - port: 8080
    protocol: TCP
    targetPort: 8080
  selector:
    app: echo-server
  sessionAffinity: None
  type: ClusterIP
$ kubectl apply -f echo_ipv6.yaml
Do not forget to include the annotation service.cilium.io/global: "true" to the service.
Network Tests
Create a test pod using the netshoot image and perform CURL requests to either the service echo-ipv6 or echo-dual. Reaching the services by their name, the system will resolve them as an IPv4 or an IPv6 address in any of the deployed clusters.
Both
$ kubectl exec -it pod-worker -- curl http://echo-ipv6:8080
$ kubectl exec -it pod-worker -- curl http://echo-dual:8080
IPv4
$ kubectl exec -it pod-worker -- curl http://echo-dual:8080
$ kubectl exec -it pod-worker -- curl --interface eth0 -4 'http://echo-dual.default.svc:8080'
IPv6
$ kubectl exec -it pod-worker -- curl http://echo-dual:8080
$ kubectl exec -it pod-worker -- curl --interface eth0 -6 'http://echo-dual.default.svc:8080'
Hubble Network Observability
Hubble UI
In part 2, we enabled Hubble for network, service and security observability. Let's use the Hubble UI and check that the services answer from different clusters. You can access the Hubble UI using port-forward or with a NodePort, LoadBalancer IP address. Make your choice.
As the application is deployed in the default namespace, from the Hubble UI, choose the default namespace from the top left drop-down box and check the traffic flow while performing different CURL requests to a test service. You should see something similar and observe IPv4 and IPv6 service sharing between clusters within a mesh.
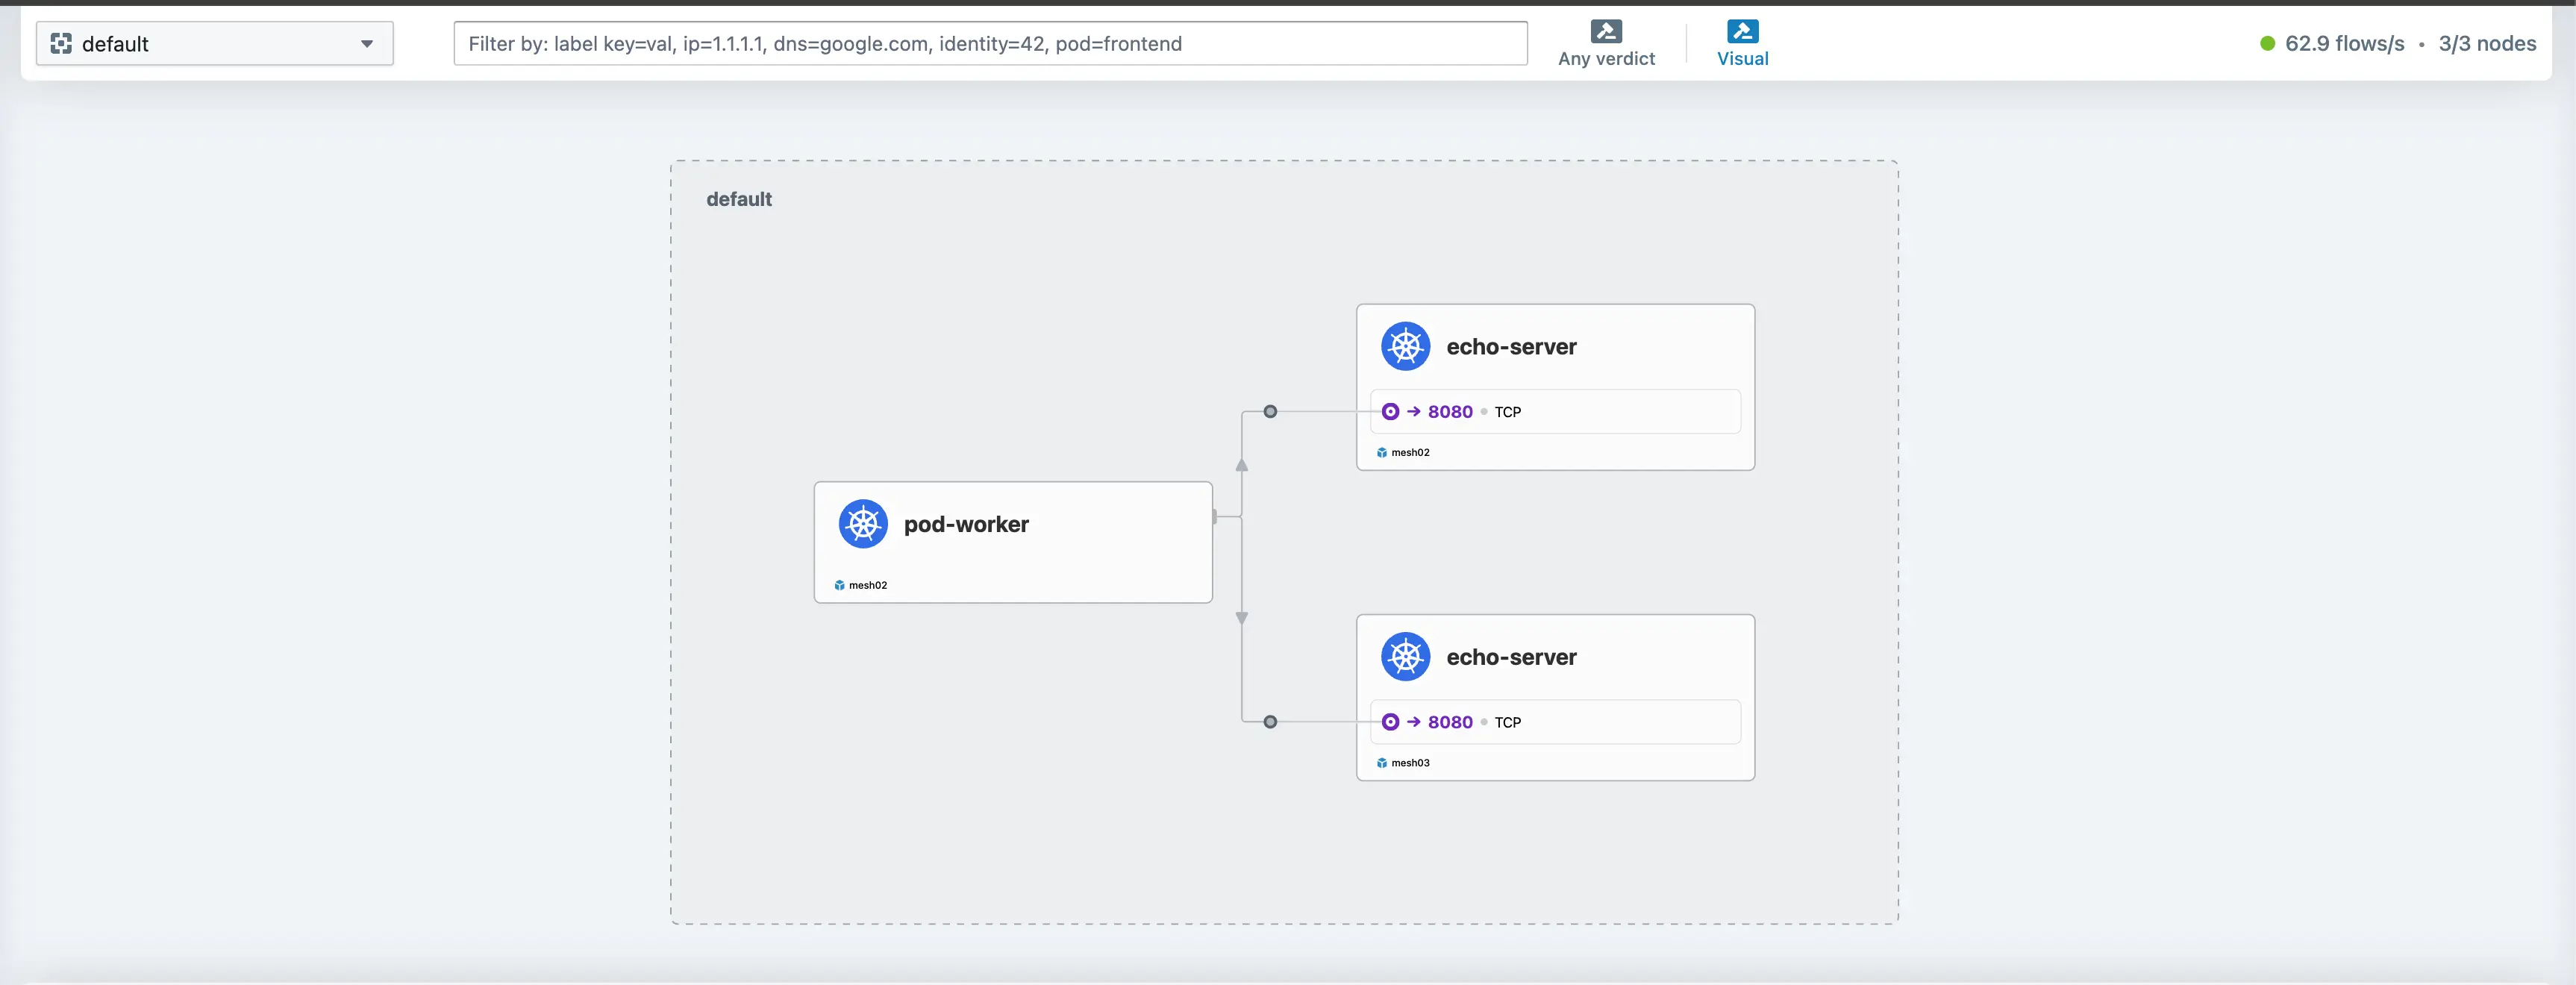

The names are mismatched in the Hubble UI screenshots: mesh02 corresponds to the cluster02 configuration, and mesh03 corresponds to the cluster01 configuration.
Cilium DaemonSet - Hubble Interaction
The same results are visible if we exec to the Cilium daemonset.
$ kubectl exec -it ds/cilium -n kube-system -- hubble observe --ipv6 --from-pod pod-worker

$ kubectl exec -it ds/cilium -n kube-system -- hubble observe --ipv4 --from-pod pod-worker
Check out the Cilium Hubble Cheatsheet for more advanced commands.
Conclusion
Cluster Mesh setup and Global Service Sharing (IPv4 and IPV6) between clusters, check! ✅ In the upcoming and final part of the series, we will explore complementary features of a Cilium Service Mesh approach.
Resources
✉️ Contact
If you have any questions, feel free to get in touch! You can use the Discussions option found here or reach out to me on any of the social media platforms provided. 😊 We look forward to hearing from you!
Series Navigation
| Part | Title |
|---|---|
| Part 1 | IPv6 prefix Allocation: Proxmox and pfSense |
| Part 2 | Dual-Stack: RKE2 with Cilium on Proxmox |
| Part 3 | Dual-Stack: Global service sharing on RKE2 using Cilium |
| Part 4 | Dual-Stack: Cilium complementary features |